1.FlutterEngineGroup
FlutterEngineGroup 是一个用于管理多个 FlutterEngine 实例的类。当你的应用需要同时运行多个 Flutter 引擎时,可以使用 FlutterEngineGroup 来有效地管理和共享资源,例如平台的插件注册和插件的通信管道。
2.FlutterEngineGroup主要用途
- 共享插件注册:在多个 Flutter 引擎之间共享插件注册,避免重复注册相同的插件。
- 优化性能:通过共享插件注册和通信管道,减少资源消耗,提高应用性能。
- 简化管理:提供一个集中的地方来管理多个 Flutter 引擎的生命周期。
3.FlutterEngineGroup适用场景
- 混合路由栈:Flutter 和 native 互跳,即 native -> Flutter -> native -> Flutter
- 模块化:使用多个 Flutter 实例,每个实例各自维护路由栈、UI 和应用状态.
- 多视图:多个Flutter View同时集成在同一个页面上,且同时显示.
4.FlutterEngineGroup示例
本示例演示多视图情况下, 两个Flutter View同时显示在同一个页面中。
AppDelegate.swift
 1
 2
 3
 4
 5
 6
 7
 8
 9
10
11
12
13
14
15
16
17
18
19
20
21
22
23
24
25
26
27
28
29
30
31
32
33
34
35
36
37
38
39
40
41
42
|
import UIKit
import Flutter

@main
class AppDelegate: UIResponder, UIApplicationDelegate {

    static let FlutterEngineMaxNum = 2

    let flutterEngineGroup = FlutterEngineGroup(name: "multiple-flutters", project: nil)
    lazy var flutterEngines:[FlutterEngine] = Array()

    func application(_ application: UIApplication, didFinishLaunchingWithOptions launchOptions: [UIApplication.LaunchOptionsKey: Any]?) -> Bool {
        // Override point for customization after application launch.

        for _ in 0..<AppDelegate.FlutterEngineMaxNum {
            let flutterEngine = flutterEngineGroup.makeEngine(withEntrypoint: "main", libraryURI: nil)
            flutterEngine.run()
            flutterEngines.append(flutterEngine)
        }

        return true
    }


    // MARK: UISceneSession Lifecycle

    func application(_ application: UIApplication, configurationForConnecting connectingSceneSession: UISceneSession, options: UIScene.ConnectionOptions) -> UISceneConfiguration {
        // Called when a new scene session is being created.
        // Use this method to select a configuration to create the new scene with.
        return UISceneConfiguration(name: "Default Configuration", sessionRole: connectingSceneSession.role)
    }

    func application(_ application: UIApplication, didDiscardSceneSessions sceneSessions: Set<UISceneSession>) {
        // Called when the user discards a scene session.
        // If any sessions were discarded while the application was not running, this will be called shortly after application:didFinishLaunchingWithOptions.
        // Use this method to release any resources that were specific to the discarded scenes, as they will not return.
    }


}
|
UIViewController.swift
 1
 2
 3
 4
 5
 6
 7
 8
 9
10
11
12
13
14
15
16
17
18
19
20
21
22
23
24
25
26
27
28
29
30
31
32
33
34
35
36
37
38
39
40
41
42
43
44
45
46
47
48
49
50
51
52
53
54
55
56
57
58
59
60
61
62
63
64
65
66
67
68
69
70
|
//
//  ViewController.swift
//  FlutterCocoaFrameworkTest
//
//  Created by ksnowlv on 2024/4/17.
//

import UIKit
import Flutter

class ViewController: UIViewController {

    var flutterViewControllers:[FlutterViewController] = []

    override func viewDidLoad() {
        super.viewDidLoad()
        // Do any additional setup after loading the view.
    }

    @IBAction func showFlutterViewEvent()  {
        //showSingleFlutterView()
        showTwoFlutterView()
    }

    @IBAction func removeFlutterViewsEvent()  {

        for item in flutterViewControllers {
            item.view.removeFromSuperview()
        }

        flutterViewControllers.removeAll();
    }


    func showTwoFlutterView() {

        guard flutterViewControllers.isEmpty else {
            return
        }

        let  viewWidth = CGRectGetWidth(self.view.frame)

        let flutterEngines = (UIApplication.shared.delegate as! AppDelegate).flutterEngines

        for engine in flutterEngines {
            let flutterViewController = FlutterViewController(engine: engine, nibName: nil, bundle: nil)

            self.view.addSubview(flutterViewController.view)
            self.view.bringSubviewToFront(flutterViewController.view)
            flutterViewControllers.append(flutterViewController)

        }

        flutterViewControllers[0].view.frame = CGRect(x: 0, y: 250, width: viewWidth/3, height: 500)
        flutterViewControllers[1].view.frame = CGRect(x: viewWidth * 2/3, y: 250, width: viewWidth/3, height: 500)
    }

    func showSingleFlutterView() {
        guard let flutterEngine = (UIApplication.shared.delegate as! AppDelegate).flutterEngines.first else { return }

        let flutterViewController = FlutterViewController(engine: flutterEngine, nibName: nil, bundle: nil)
        let navigationController = UINavigationController(rootViewController: flutterViewController)
        navigationController.navigationBar.topItem?.rightBarButtonItem = UIBarButtonItem(barButtonSystemItem: .stop, target: self, action: #selector(dismissFlutterViewController))
        present(navigationController, animated: true, completion: nil)
    }

    @objc func dismissFlutterViewController() {
        dismiss(animated: true, completion: nil)
   }
}
|
5. 效果
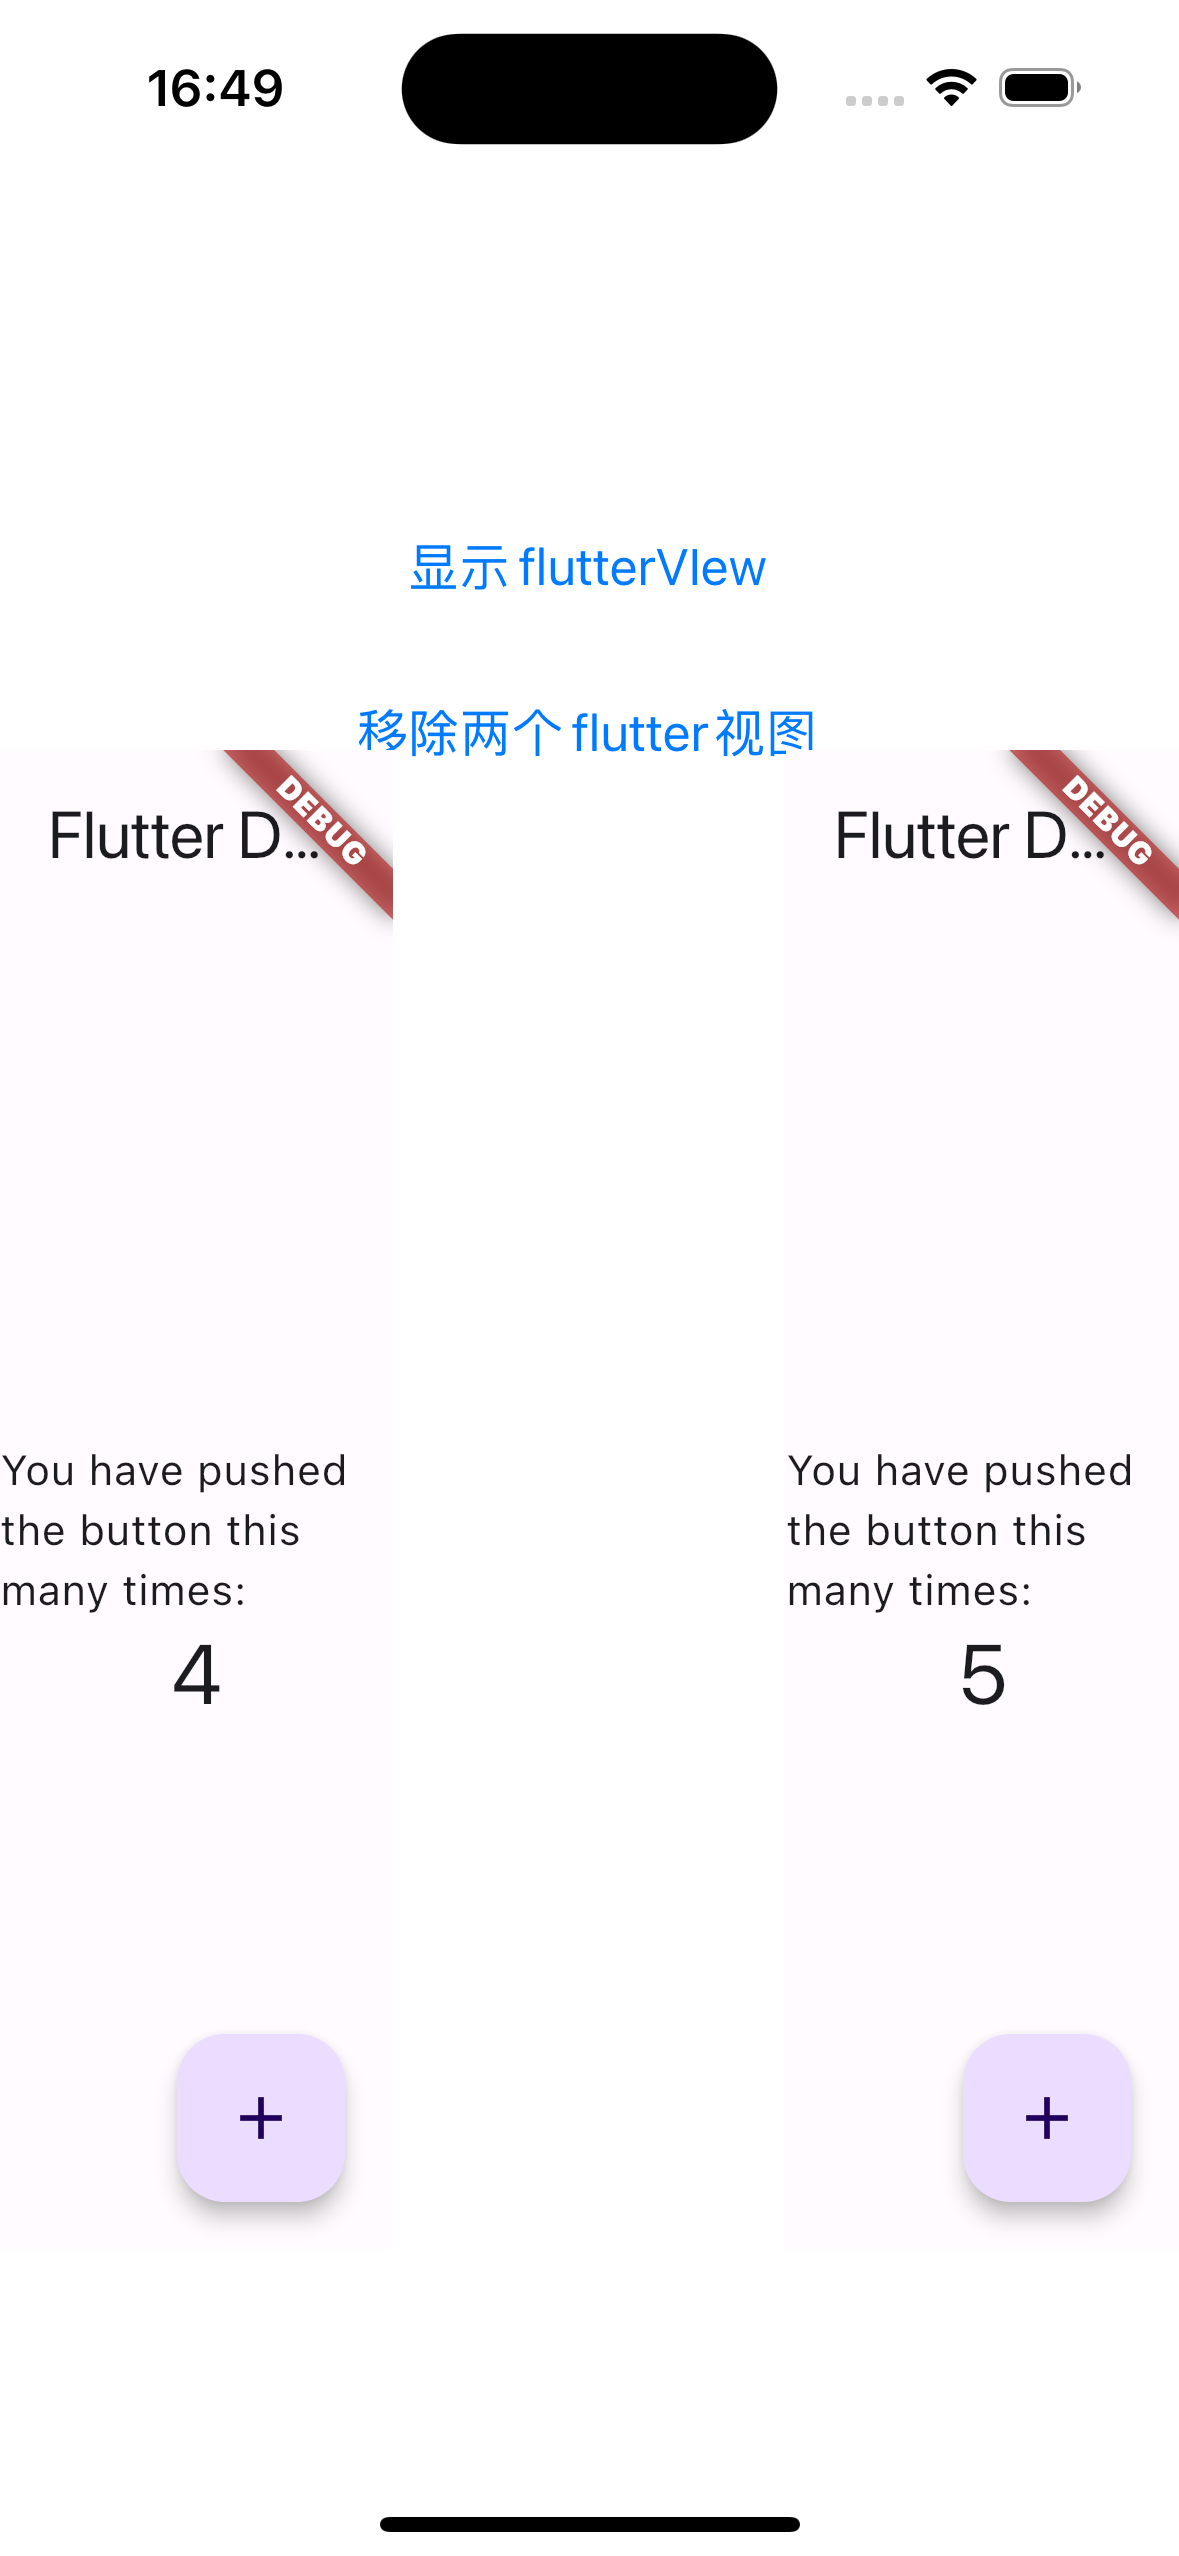
当然上述示例,直接使用两个FlutterEngine也是可以的。
文章作者
梵梵爸
上次更新
2024-04-18
许可协议
原创文章,如需转载请注明文章作者和出处。谢谢