fastapi使用http2
Hypercorn是支持http2的,如何使用fastapi和Hypercorn开启http2呢?
1.Hypercorn安装
 1
 2
 3
 4
 5
 6
 7
 8
 9
10
11
12
13
14
15
16
17
18
19
20
21
22
|
 pip3 install -i https://pypi.tuna.tsinghua.edu.cn/simple/ --upgrade hypercorn
Looking in indexes: https://pypi.tuna.tsinghua.edu.cn/simple/
Collecting hypercorn
  Downloading https://pypi.tuna.tsinghua.edu.cn/packages/75/01/454a0127f2e554502fca9aca2a3b39ab850c7962dbabf32ce5ab113f229f/hypercorn-0.15.0-py3-none-any.whl (57 kB)
     ━━━━━━━━━━━━━━━━━━━━━━━━━━━━━━━━━━━━━━━━ 57.8/57.8 kB 678.0 kB/s eta 0:00:00
Requirement already satisfied: h11 in ./venv/lib/python3.11/site-packages (from hypercorn) (0.14.0)
Collecting h2>=3.1.0 (from hypercorn)
  Downloading https://pypi.tuna.tsinghua.edu.cn/packages/2a/e5/db6d438da759efbb488c4f3fbdab7764492ff3c3f953132efa6b9f0e9e53/h2-4.1.0-py3-none-any.whl (57 kB)
     ━━━━━━━━━━━━━━━━━━━━━━━━━━━━━━━━━━━━━━━━ 57.5/57.5 kB 804.7 kB/s eta 0:00:00
Collecting priority (from hypercorn)
  Downloading https://pypi.tuna.tsinghua.edu.cn/packages/5e/5f/82c8074f7e84978129347c2c6ec8b6c59f3584ff1a20bc3c940a3e061790/priority-2.0.0-py3-none-any.whl (8.9 kB)
Collecting wsproto>=0.14.0 (from hypercorn)
  Using cached https://pypi.tuna.tsinghua.edu.cn/packages/78/58/e860788190eba3bcce367f74d29c4675466ce8dddfba85f7827588416f01/wsproto-1.2.0-py3-none-any.whl (24 kB)
Collecting hyperframe<7,>=6.0 (from h2>=3.1.0->hypercorn)
  Downloading https://pypi.tuna.tsinghua.edu.cn/packages/d7/de/85a784bcc4a3779d1753a7ec2dee5de90e18c7bcf402e71b51fcf150b129/hyperframe-6.0.1-py3-none-any.whl (12 kB)
Collecting hpack<5,>=4.0 (from h2>=3.1.0->hypercorn)
  Downloading https://pypi.tuna.tsinghua.edu.cn/packages/d5/34/e8b383f35b77c402d28563d2b8f83159319b509bc5f760b15d60b0abf165/hpack-4.0.0-py3-none-any.whl (32 kB)
Installing collected packages: wsproto, priority, hyperframe, hpack, h2, hypercorn
Successfully installed h2-4.1.0 hpack-4.0.0 hypercorn-0.15.0 hyperframe-6.0.1 priority-2.0.0 wsproto-1.2.0

[notice] A new release of pip is available: 23.2.1 -> 23.3.1
[notice] To update, run: pip install --upgrade pip
|
2.证书安装
http2是强制加密的,所以需要安装证书才行
所以需生成key.pem的私钥文件和一个名为cert.pem的证书文件,用于启用 SSL/TLS 加密连接。这个自签名证书适用于测试和开发环境,但在生产环境中建议使用由权威的证书颁发机构(CA)签发的证书。
OpenSSL 生成自签名 SSL 证书的命令
openssl req -x509 -newkey rsa:4096 -keyout key.pem -out cert.pem -days 730 -nodes
req:表示使用 OpenSSL 的证书请求子命令
-x509:表示生成自签名证书而不是证书请求
-newkey rsa:4096:表示生成一个 RSA 密钥对,密钥长度为 4096 bit
-keyout key.pem:表示将私钥保存到 key.pem 文件中
-out cert.pem:表示将证书保存到 cert.pem 文件中
-days 730:表示证书的有效期为 730 天
-nodes:表示不加密私钥,生成的私钥文件无密码保护
 1
 2
 3
 4
 5
 6
 7
 8
 9
10
11
12
13
14
15
16
17
18
19
20
21
22
23
24
25
|
(base) lvwei@lvweideMacBook-Pro Documents % mkdir cerfile
(base) lvwei@lvweideMacBook-Pro Documents % cd cerfile
(base) lvwei@lvweideMacBook-Pro cerfile % openssl req -x509 -newkey rsa:4096 -keyout key.pem -out cert.pem -days 730 -nodes
...+.......+...+...+.....+.......+...+..+.+..+.......+..+....+.....+..........+.........+.....+......+++++++++++++++++++++++++++++++++++++++++++++*............+...+......+.........+..........+......+.....+......+....+..+++++++++++++++++++++++++++++++++++++++++++++*...+..+....+.....+.............+...+++++
...+..+.+........+.+...+..+.+............+.....+...+............+.+.....+.+++++++++++++++++++++++++++++++++++++++++++++*........+.......+..+.......+...........+...+....+.....+.+.....+.......+...+.....+.+..............+......+...+..........+++++++++++++++++++++++++++++++++++++++++++++*.........+.....+........................+.+...+..+......+...+....+........+............+..........+...............+............+........+.+..............+.+.................+...............+..........+.....+....+...+........+.......+.....+...............+.............+...............+........+....+..+...............+.+..+...+.......+..+..........+......+...+.....+.......+..+.......+......+..+.+..+....+........+...+..........+..............+.+.........+...........+...+.......+...+..+...+.+.........+.....+............+..............................+...........................+.+..+....+........+.+..+.........+...+.+...........................+........+...................+............+.....................+..+.............+...+......+.......................+...+...+....+...........+.......+.....+.........+..........+........+.+.........+..+.+..+.+.....+................+...........+..................+......+...+.......+..................+...............+..+....+........................+...........+....+......+..+...+......+...+......................+...+.....+.+..+...+....+.....+......+.+......+...........................+..+....+..............+.+.........+..................+..+..........+.....+............+.+............+.................+....+.........+.....+.+.........+...........+.........+.+....................+.+.........+...........+.+....................+.......+......+...........+...+..................+.........+................+........+.+..............+......+...............+..........+.....+...+.+..+..........+...+.....+....+.....................+.....+...........................+...+....+...............+..+.........+....+...+........+.........+............+.+..+.+.........+.....+.........................+..+.+.....+...............+...+..........+...........+.........+......+.+..+.+..+...+....+..+.............+...+..............+.+..+...+++++
-----
You are about to be asked to enter information that will be incorporated
into your certificate request.
What you are about to enter is what is called a Distinguished Name or a DN.
There are quite a few fields but you can leave some blank
For some fields there will be a default value,
If you enter '.', the field will be left blank.
-----
Country Name (2 letter code) [AU]:china
String too long, must be at most 2 bytes long
Country Name (2 letter code) [AU]:cn
State or Province Name (full name) [Some-State]:beijing
Locality Name (eg, city) []:beijing
Organization Name (eg, company) [Internet Widgits Pty Ltd]:my
Organizational Unit Name (eg, section) []:test
Common Name (e.g. server FQDN or YOUR name) []:fastapi
Email Address []:ksnowlv@163.com
(base) lvwei@lvweideMacBook-Pro cerfile % ls
cert.pem	key.pem
(base) lvwei@lvweideMacBook-Pro cerfile %
|
3.http2服务重启
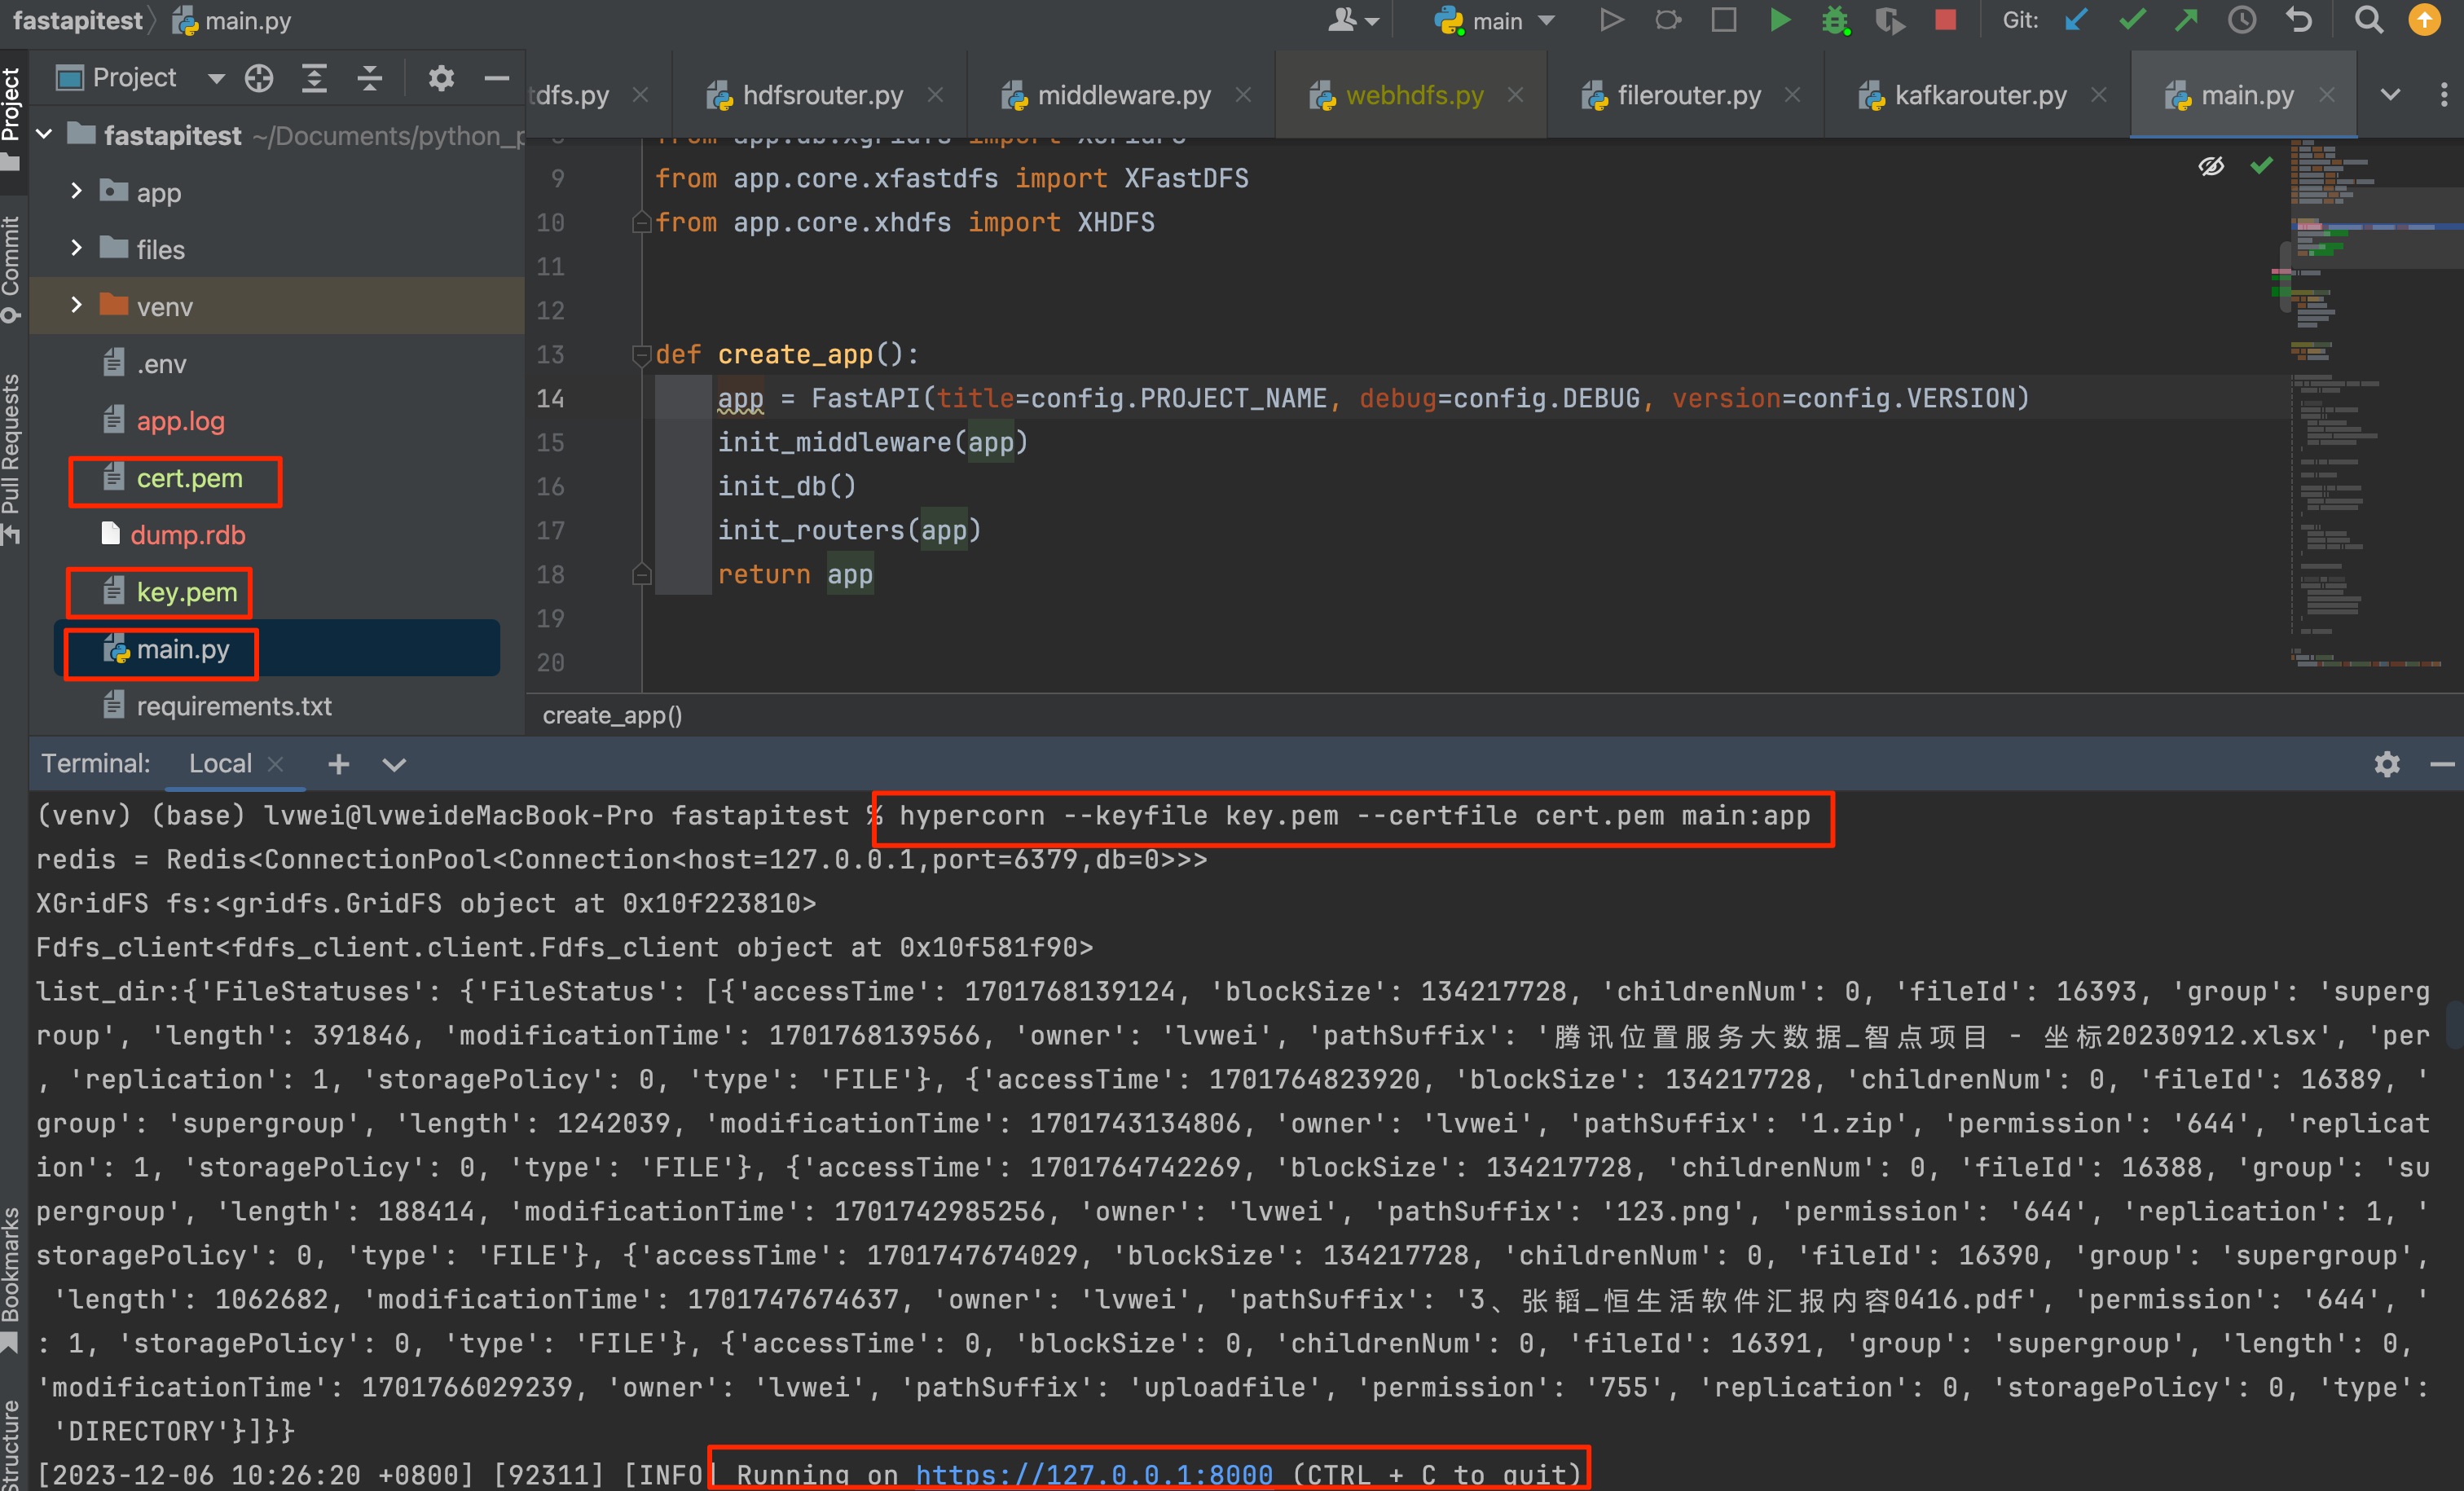
如图配置好自签名证书后,通过hypercorn命令启动服务
hypercorn --keyfile key.pem --certfile cert.pem main:app
在浏览器中打开https://127.0.0.1:8000/docs
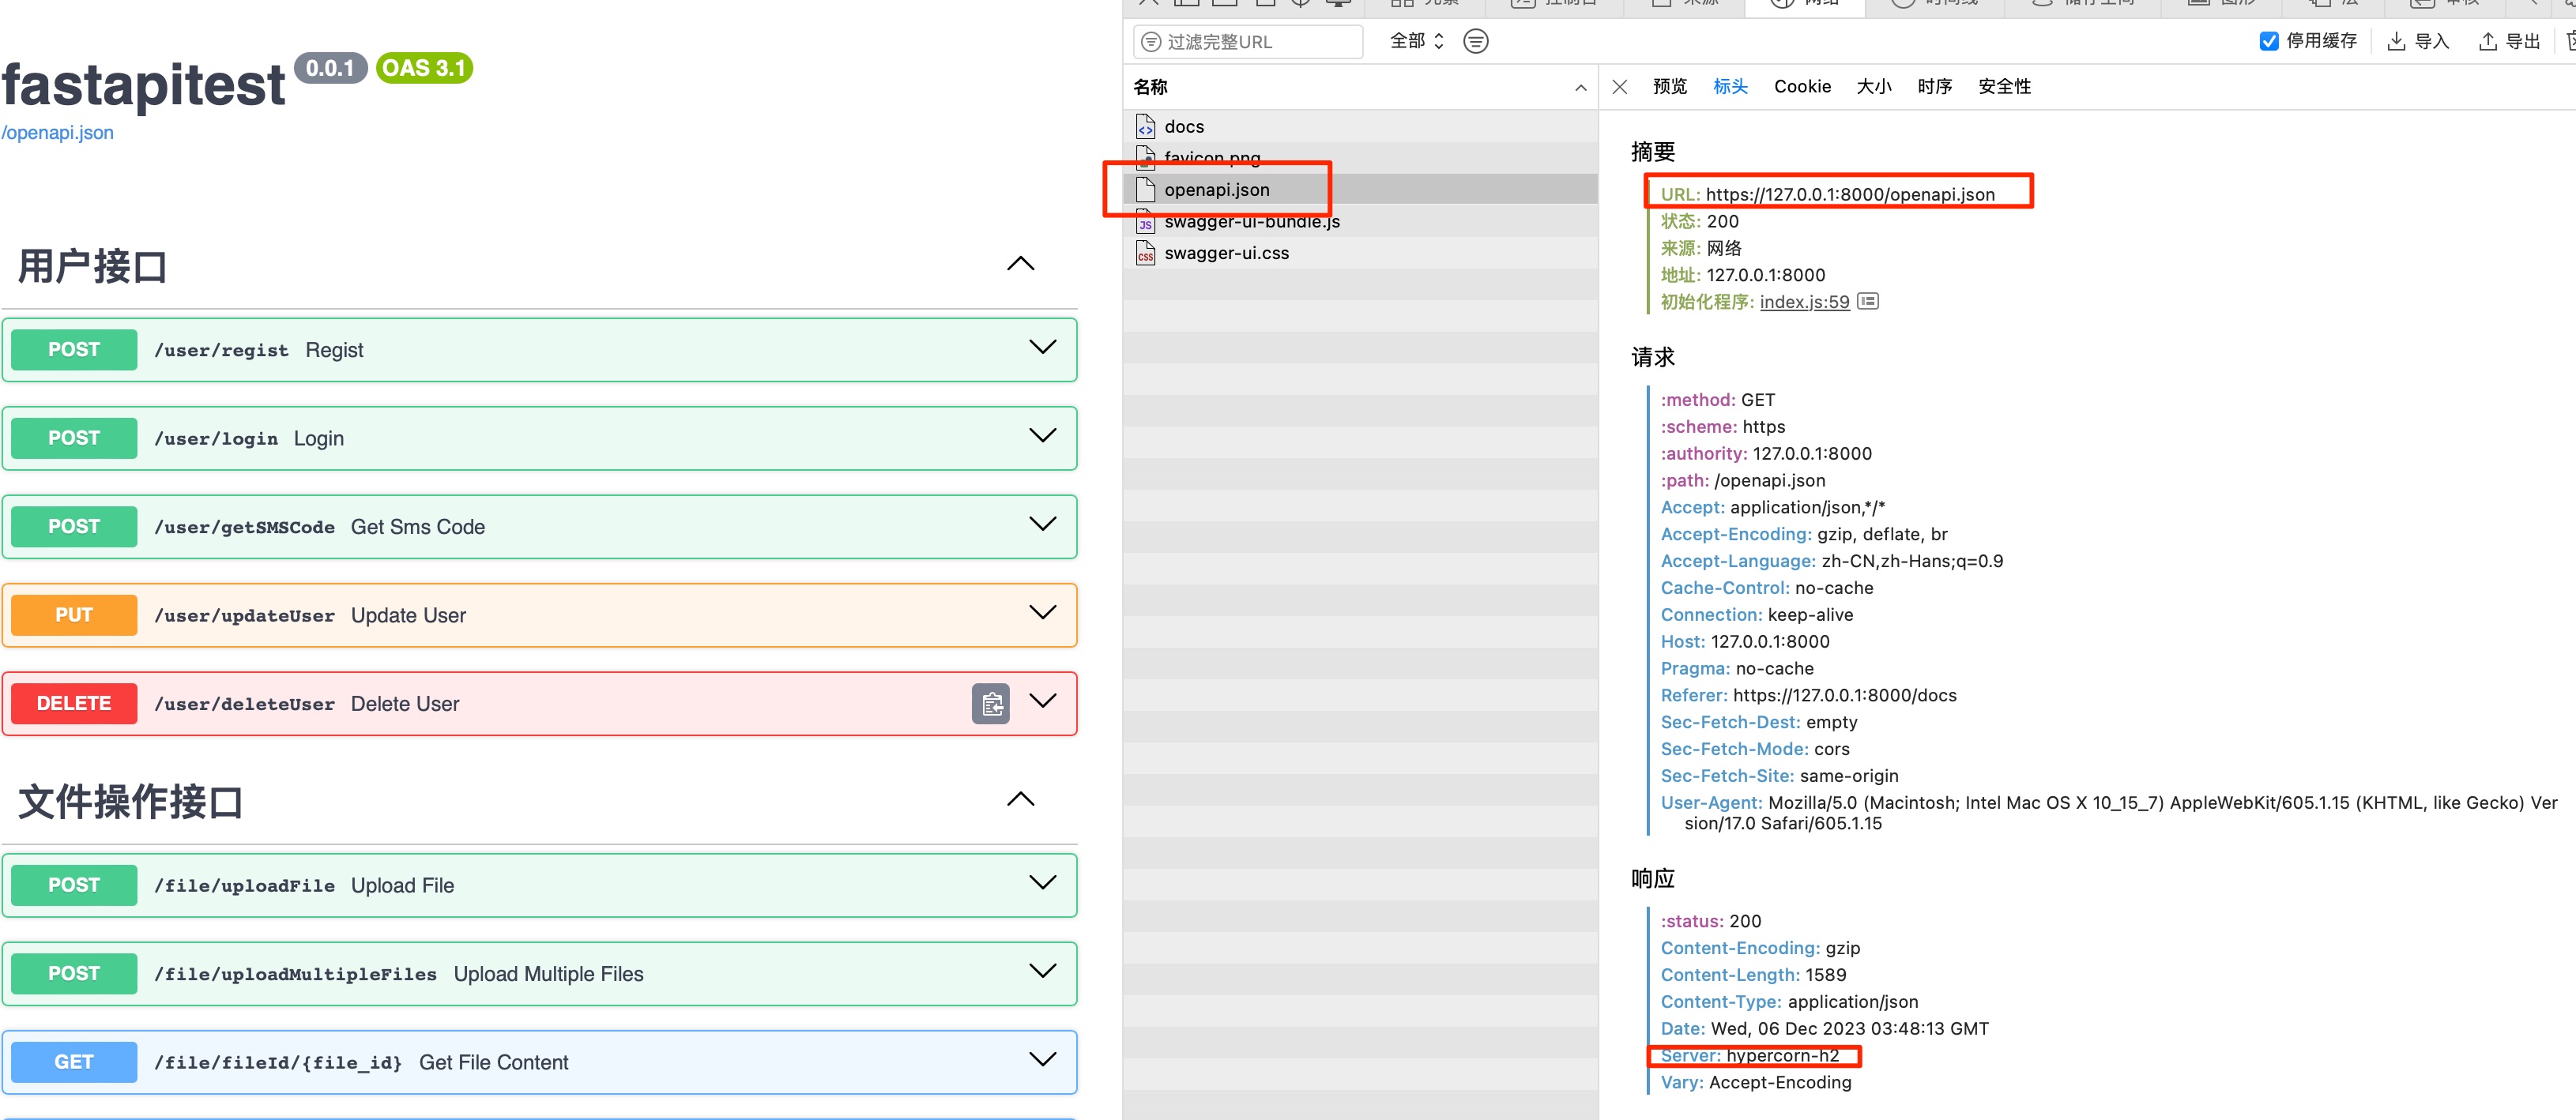
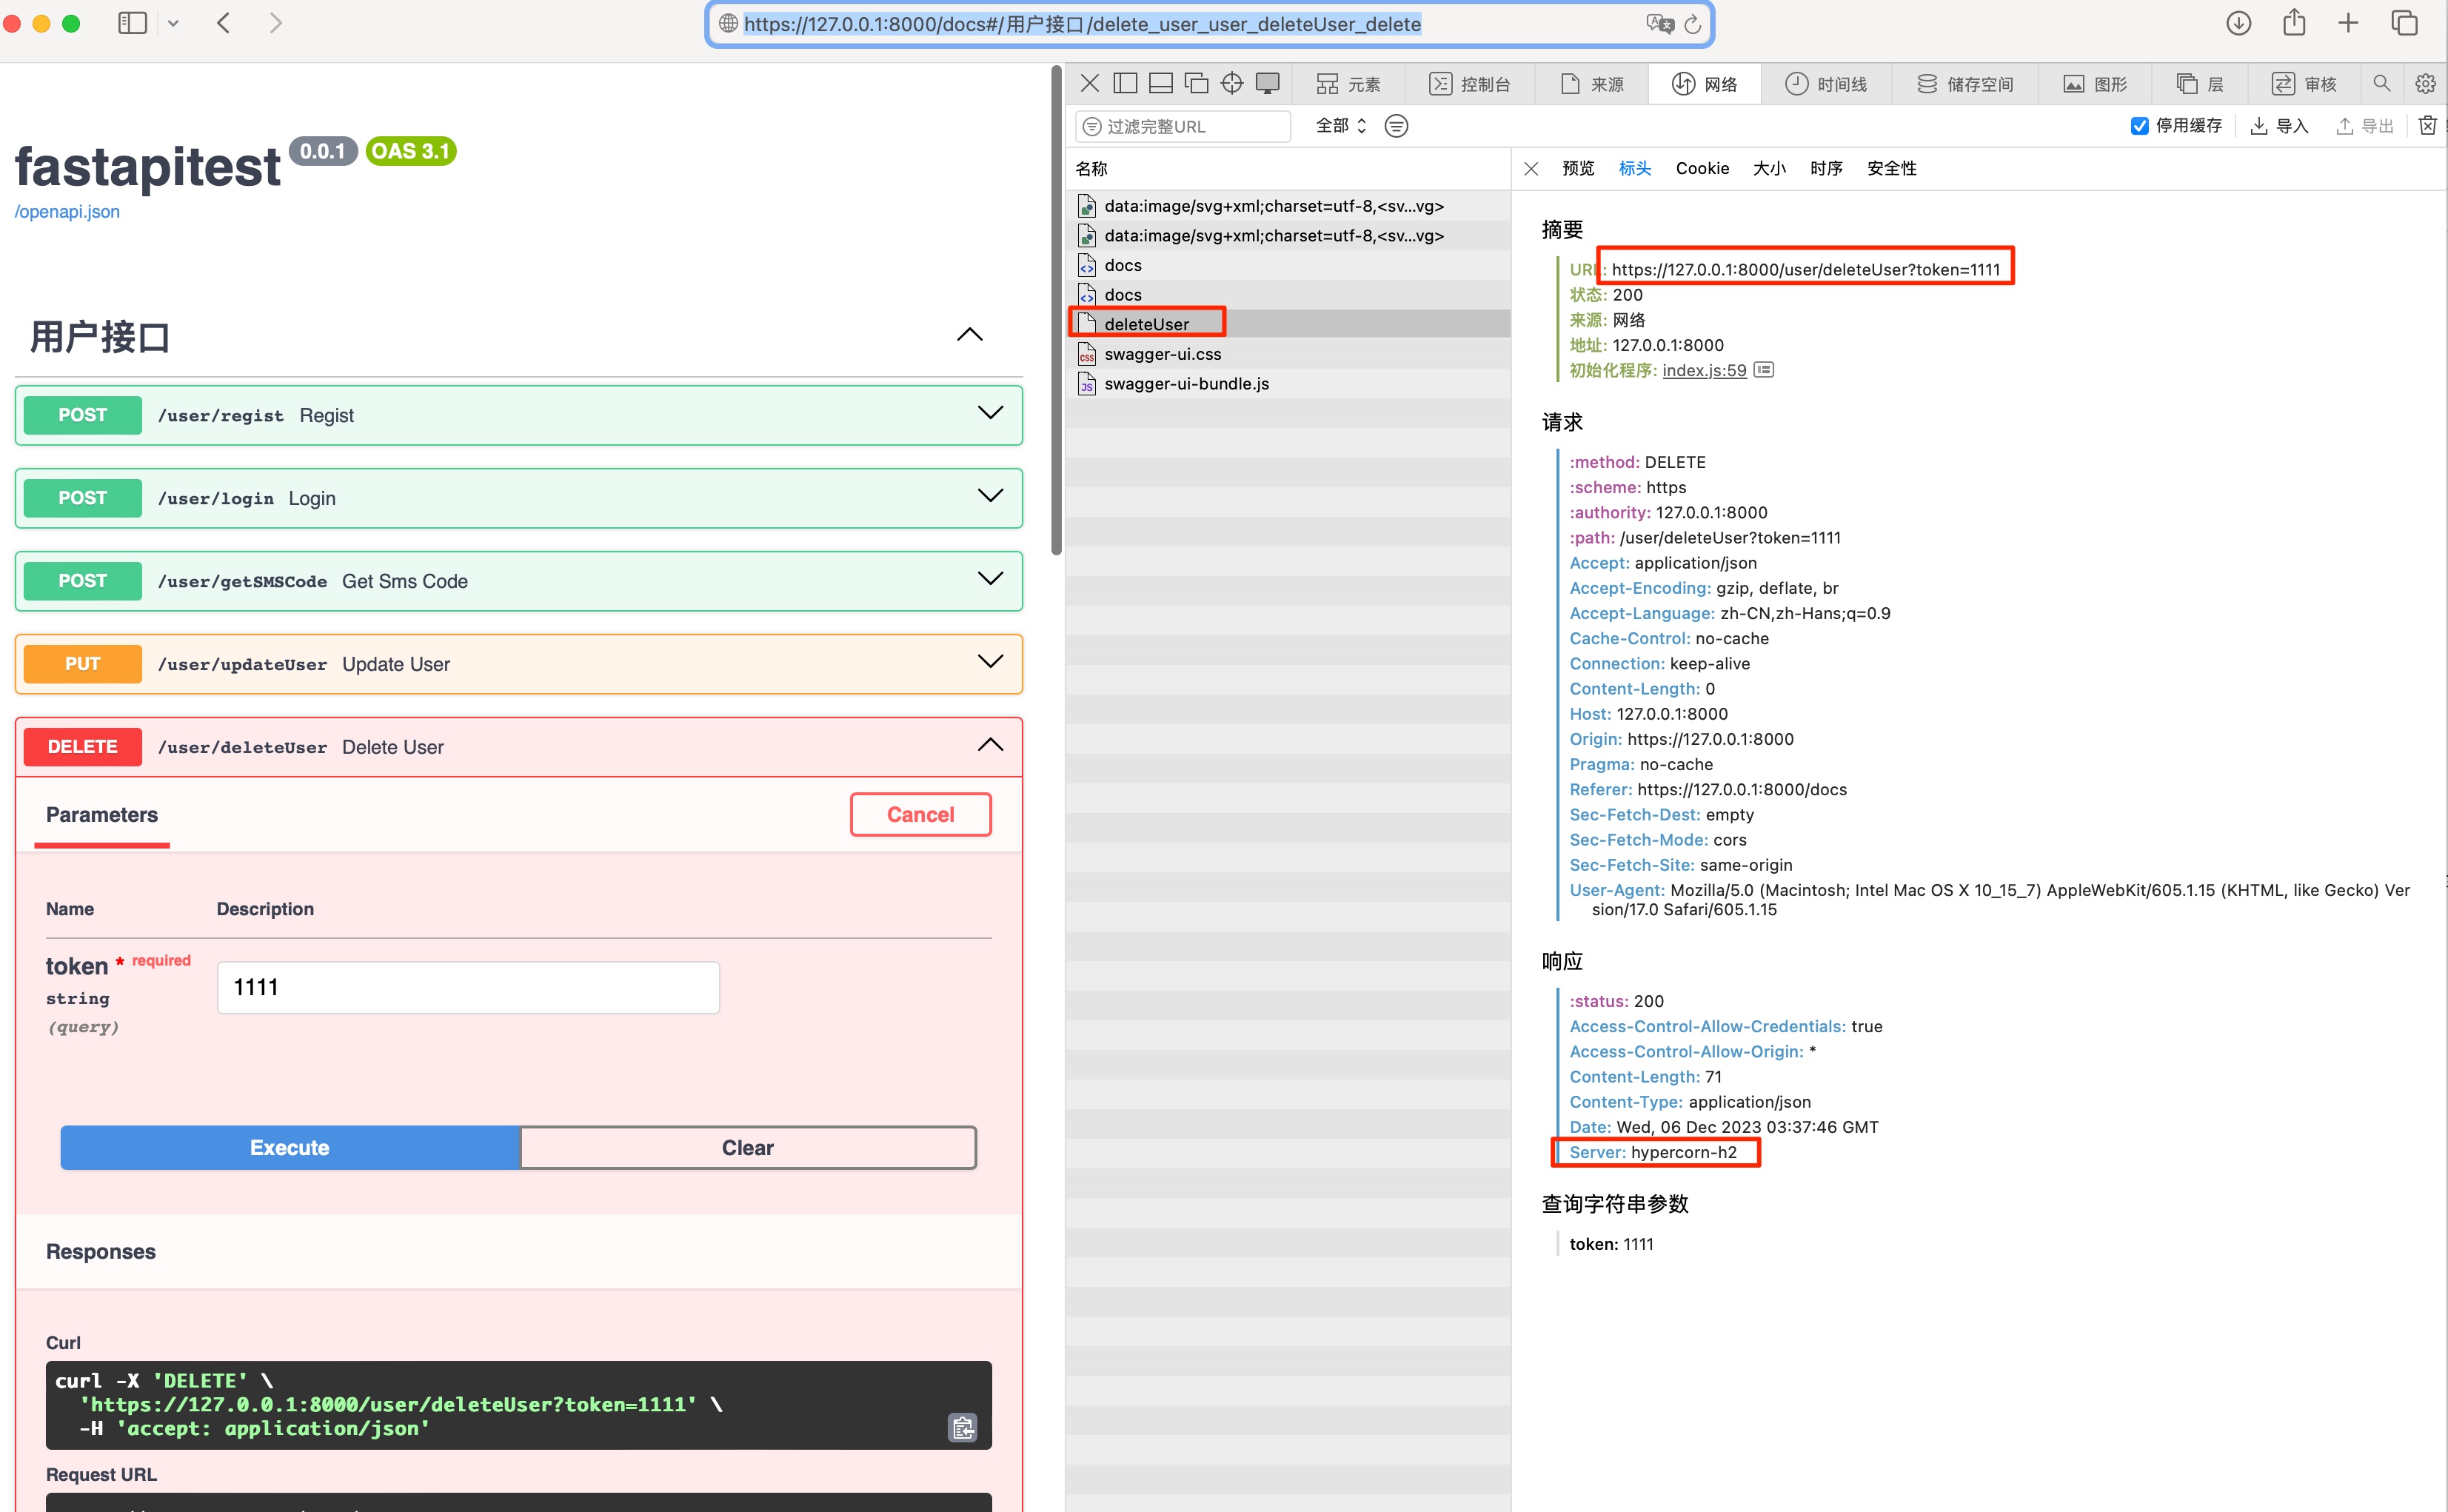
无论是网页还是接口请求,出现Server: hypercorn-h2字样,http2即生效
文章作者
梵梵爸
上次更新
2023-12-06
许可协议
原创文章,如需转载请注明文章作者和出处。谢谢