 1
 2
 3
 4
 5
 6
 7
 8
 9
10
11
12
13
14
15
16
17
18
19
20
21
22
23
24
25
26
27
28
29
30
31
32
33
34
35
36
37
38
39
40
41
42
43
44
45
46
47
48
49
50
51
52
53
54
55
56
57
58
59
60
61
62
63
64
65
|
class ViewController: UIViewController,UITableViewDataSource,UITableViewDelegate {
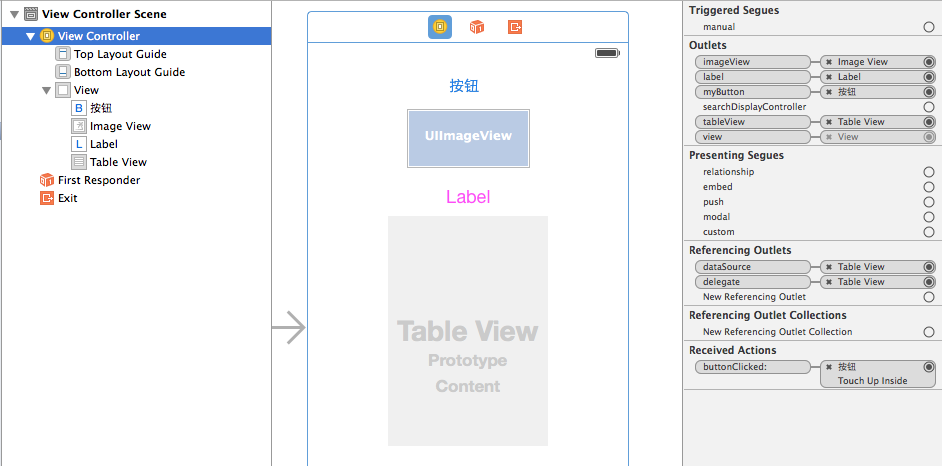
@IBOutlet weak var myButton: UIButton!
@IBOutlet weak var imageView: UIImageView!
@IBOutlet weak var label:UILabel!
@IBOutlet weak var tableView:UITableView!
var list:NSArray!
override func viewDidLoad() {
super.viewDidLoad()
// Do any additional setup after loading the view, typically from a nib.
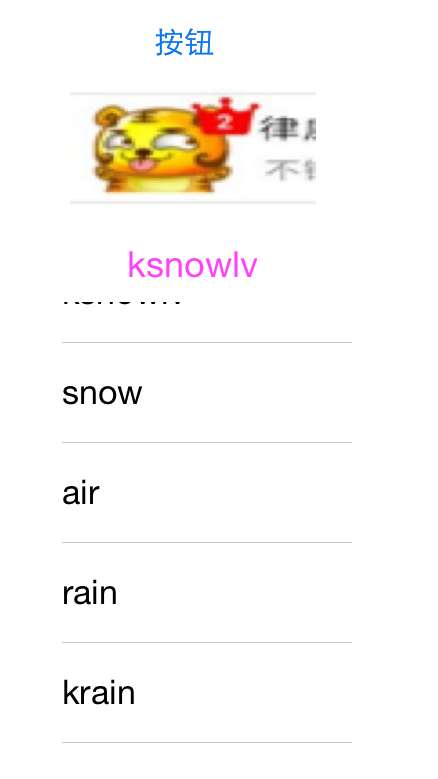
var image : UIImage = UIImage(named:"qq_icon.jpg");
self.list = ["kair","ksnowlv","snow","air","rain","krain","cloud","kcloud"];
self.imageView.image = image;
self.label.text = "ksnowlv";
}
override func didReceiveMemoryWarning() {
super.didReceiveMemoryWarning()
// Dispose of any resources that can be recreated.
}
@IBAction func buttonClicked(sender: UIButton) {
// The tag for each color was set in the storyboard for each button based
// on the type of color.
var alertView:UIAlertView = UIAlertView(title: "swift UIAlertView", message: "按钮被按下", delegate: nil, cancelButtonTitle: "ok");
//title: String?, message: String?, delegate: AnyObject?, cancelButtonTitle: String?
alertView.show();
}
func tableView(tableView: UITableView, numberOfRowsInSection section: Int) -> Int{
return self.list.count;
}
func tableView(tableView: UITableView, cellForRowAtIndexPath indexPath: NSIndexPath) -> UITableViewCell{
let KTableViewCellIdentifier = "tableViewCellIdentifier";
var cell = tableView.dequeueReusableCellWithIdentifier(KTableViewCellIdentifier) as UITableViewCell!
if (cell == nil) {
cell = UITableViewCell(style:.Default, reuseIdentifier: KTableViewCellIdentifier)
}
var rowIndex = indexPath.row;
if rowIndex < self.list.count{
cell.textLabel?.text = self.list.objectAtIndex(rowIndex) as NSString;
}
return cell;
}
func tableView(tableView: UITableView, heightForRowAtIndexPath indexPath: NSIndexPath) -> CGFloat{
if self.tableView == tableView{
return 50;
}
return 40;
}
}
|